Successful onboarding is more than a welcome tour. The steps, tools, and resources accompany a user continuously through your platform.
Understanding how different elements of the online journey complement one another is essential to creating a delightful user experience.
Do you already use tours for your product? If not, try Product Fruits 🍇 with a 14-day free trial and see how our product tours work.
Tours and Hints: the basics
Let’s start with a few definitions.
Onboarding Tours are steps or cards that guide users through a platform to accomplish a certain goal. Each step is accompanied by either an action or information.
Here’s an example of a tour by Writer, showing their generative AI writing platform with a tour card.
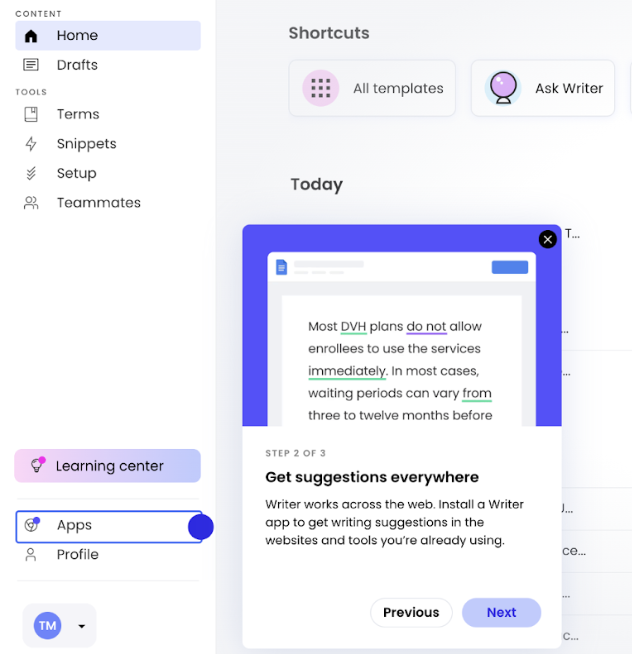
(Image Source: Writer)
Onboarding Hints are a contextual onboarding feature. This means they provide additional information as users self-explore a platform.
How to combine Tours and Hints
Tours and hints support one another. A use that choses to explore a platform without tours needs the infromation that hints can provide. And likewise, actions that require multiples step require tours to show the sequence of actions.
In a nutshell: Tours provide structure, hints provide context.
Tours and Hints not only complement each other as two stand-alone product adoption tools, but in Product Fruits you can easily combine them to create more engaging user flows.
For example, you can provide the user with basic information using hint card while offering an option to get more details through a feature tour.
How to create tours and hitns with Product Fruits
Product Fruits acts as an invisible layer on top of your platform. It allows you create an onabording journey by clicking and dragging onboaridng tools wihtout code.
Each feature is customizable and can be personalized to each user.
To add a tour to a hint, follow these steps:
- Insert a button in the hint card.
- That button starts the more detailed tour.
- This is one of the many pre-built scenarios that you’ll find in our drag&drop editor.
Try it for yourself for free, or talk to our user onboarding specialists and get the best practices to achieve your onboarding goals.
